|
|
|
![]()
1 - Introduction To The Cockpit
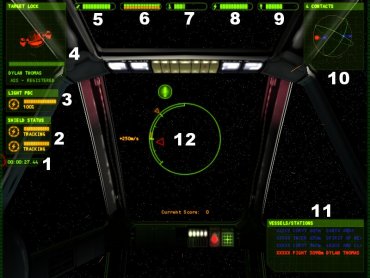
The picture above shows a pilots-eye view from the cockpit. As you can see, there are several dials showing information about the ship. These are projected directly on to the pilot's visor using lasers mounted in
the headpiece. This display is referred to as the Heads Up Display, or HUD.
Each of the dials has been designed to be simple to understand. In the picture each of the cockpit readouts is labelled and we will explain what each one does.
|
1. Mission Time This clock display shows how much time has elapsed since your ship last left your base. |
|
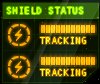
2. Shield Status Some of the ships you fly have shields installed. Their charge will be shown as a bar here. If the shields lose their charge your hull will be hit and your ship will be damaged. |
 |
|
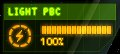
3. Weapon Status The weapon that you currently have selected is shown here along with its charge status. We will discuss ship weapons in a little more detail later. |
 |
|
4. The Multifunction Display (MFD) This display has three functions:
The communication function is used when any of the Badlands inhabitants to you when you are in the cockpit. |
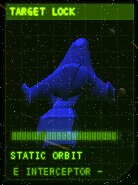 |
When your weapons systems are locked on to a target, a view of the target is shown in the MFD. In addition the display shows details of the targeted ship and its systems. For more information refer to "Using Weapons Systems" further on in this manual.
|
5. Hull Integrity The state of your hull is represented as a bar to the right of a spanner icon. If you receive enough damage to make the bar disappear, your ship will be destroyed. |
|
6. Systems Health Display Each of the warning lights on this display represents the health of each of the systems on board your ship. |
|
7. Temperature Gauge During normal operation your ship will generate a significant amount of heat. This is radiated off into space. However, when you use your weapons your ship can get very hot very quickly.
If the green bar starts to creep up to the right hand side of the dial you are likely to start to suffer random failure of ships systems. |
|
8. Electrical Power Gauge All systems on your ship require electrical power. The power gauge shows you the amount of power generated by your ship's reactor. When the gauge is full the reactor is generating power at 100% efficiency. If the power is decreased for any reason, ship systems will start to automatically shut down. |
|
9. Ship Brightness Gauge This gauges how visible your ship is to the scanners on other ships. The 'brighter' you are, the further away you can be detected by other ships.
|
|
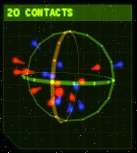
10. The Radar ORB The ORB is a 3D representation of a 1km area immediately surrounding your ship. The player's ship is at the center. Each contact in range is shown as a point and a stalk attached to the ORB. The further away a ship is, the further away from the sphere is its point (and the longer the stalk). If the contact is inside the 1Km sphere, the stalk goes inwards. The currently selected target is marked as a flashing point. All the contacts are colour-coded using the same scheme used on the contacts list.
|
 |
|
11. The Contacts List The Contact List is displayed bottom right of the HUD and is used to display list objects and waypoints in order of distance around the players ship. |
 |
A contact refers to any vessel, station or waypoint that you encounter in the game.
A waypoint is a electronic marker used for navigation purposes. Waypoints are placed at key areas of geography such as planets and asteroids, or at stations, to make it easier for you travel to them - you can simply select the waypoint on the Contacts list and use the Autopilot function to get there (see below for details).
A target can refer to any contact that you have selected via the HUD menu, so it might be your intended destination, or it can be what is normally thought of as a target - i.e. something that you shoot at, such as another ship or station.
The Contact list display has two modes, or filters:
-
Waypoints
- Vessels/Stations
When waypoints are selected, all the waypoints in the current solar system are shown. Waypoints are used for navigation. and are explained in the
starmap section.
When the Vessels/Stations filter is selected, all the ships and space stations that the ship's sensors have detected are listed.
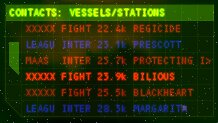
The pilot can select the Contact list filter from the HUD Menu or from the keyboard shortcut. The current filter mode is shown in the top green bar of the Contact list. The Vessels/Stations filter is shown in the
picture below.
Contacts on the list are colour-coded:
| Colour | Type |
| Yellow | Neutral vessels or vessels of unknown allegiance. |
| Red | Hostile vessels |
| Blue | Friendly or allied vessels. |
| Green | Mission-critical ship - this vessel is crucial in some way to your completion of your mission requirements. |
Each contact has the following information shown about it, from left to right:
- A 5 letter code describing the contact's allegiance.
- The type of the contact.
- The distance to the contact. The representation changes with distance, showing meters, kilometres or scientific notation as appropriate.
- The name of the contact. If the contact has a long name, the name will scroll when the contact is selected.
The contact currently selected is highlighted in bold. This is your current target for your autopilot system and, in the case of ships, for your weapons systems. Scrolling up and down the list can be done by using 'Next' and 'Previous' on the HUD menu, by using joystick buttons 3 and 4, or by using shortcut keys.
|
12. The Reticle The Reticle serves two purposes:
The image on the right shows the Reticle in targeting mode. In this mode, the pilot can target a contact, use his Reticle to take aim with the guns and see the throttle settings. |
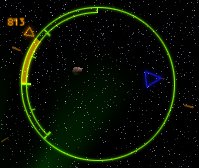 |
The throttle is shown as an orange arrow that travels around the left hand side of the reticle with three figures showing the requested or 'set' speed. The actual speed that the ship is travelling at is represented as a curved bar. For more information on the throttle see the "Manoeuvring Your Ship" section.
The triangular pip on the inside of the target reticle is the target locator. It points towards your current target. When the target is off-screen, the target locator points in its general direction.
| If the target is onscreen you it will be indicated with the target indicator shown on the right. Note that the target indication will change color according to the allegiance of the target. |
Other icons are also used around the area of your reticle to provide you with useful
information.
When the reticle is in HUD Menu mode you can easily and directly control your ships
systems with a few keypresses.
The use of this system is covered in the
Using The HUD Menu section.
Next Section: 2 - Flying Your Ship
![]()
![]()